
Discover a step-by-step guide for seamless Astro setup, incorporating Prettier, ESLint, and Tailwind CSS. Enhance your coding workflow effortlessly.
0. Why?#
By establishing a workflow with ESLint and Prettier, you can maintain code consistency, reduce potential errors, and improve readability in your Astro projects, ensuring a cleaner and more maintainable codebase. And Tailwind CSS is something that I use.
1. Install and setup astro#
Navigate to the folder where you store your projects, like ~/Desktop, in your terminal and run the command.
1npm create astro@latest
It will ask you to specify the location for your new project. For example, enter "./astro-tailwind" to create the "astro-tailwind" folder and set up Astro inside it. Open "astro-tailwind" with the following command.
1code astro-tailwind
The above command only works when you have vs code installed.

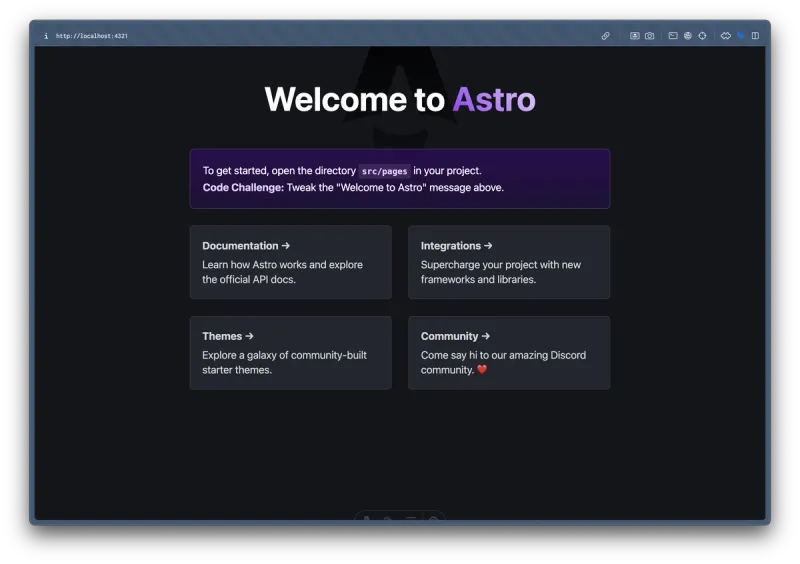
Once opened in the code editor, you'll find files and folders in your project. To open the terminal, use Ctrl + `. Then, run the following command to start your development server. Astro provides some UI by default. You should see it once your server is up and running. I'll share a screen capture for reference and this UI may change in future.
1npm run dev
Visit your localhost, and access the astro pre populated dashboard. It should show something like this.
Next install astro extension on your VS Code
2. Install and setup TailwindCSS#
If your terminal is running local server, exit using Ctrl + C, then run the following command to install tailwind.
1npx astro add tailwind
This will do 2 things.
- Creates a tailwind.config.mjs file in your project's root directory.
- Integrates tailwind() in astro.config.mjs file.
That's it. Manual installation and configuration are unnecessary. Refer to this documentation if interested.
Bonus tip: Install Tailwind CSS Intellisense on your VS Code before you proceed.
3. Test Tailwind CSS#
Now let's cleanup your index.astro file from your src/pages folder. Navigate to src/pages/index.astro and remove everything except Layout wrapper and add h1 tag with tailwind classes. Your index.astro file should now look something like this.
1---
2import Layout from '../layouts/Layout.astro';
3---
4
5<Layout title="Welcome to Astro.">
6	<h1 class="text-white text-3xl p-10">Hello World ;)</h1>
7</Layout>
8
To verify this, restart your development server by running this command in your terminal.
1npm run dev

Congratulations on successfully setting up Tailwind with Astro if you see a similar output. In the image above, you can observe that padding, text color, and size were applied as specified in the index.astro file for our h1 tag.
4. Install and setup Prettier#
Install the prettier extension on VS Code, and use the following command to install prettier packages
1npm install --save-dev prettier prettier-plugin-astro prettier-plugin-tailwindcss
If you haven't installed tailwind css, you can skip adding prettier-plugin-tailwindcss. After installing Prettier, Generate .prettierrc.json and .prettierignore files in your project's root folder based. And feel free to explore official configuration. If you're using mac, you can use touch command as follows.
1touch .prettierrc.json && touch .prettierignore
You can refer to prettier official docs to set it up according to your preferences. Alternatively, use the provided code in ~/.prettierrc.json.
1{
2  "trailingComma": "none",
3  "overrides": [
4    {
5      "files": "*.svg",
6      "options": {
7        "parser": "html"
8      }
9    },
10    {
11      "files": "*.astro",
12      "options": {
13        "parser": "astro"
14      }
15    }
16  ],
17  "plugins": ["prettier-plugin-astro", "prettier-plugin-tailwindcss"]
18}
And navigate to ~/.prettierignore and insert below code.
1dist
2node_modules
Enable Prettier for Astro files by following these steps:
1. Create a settings.json file in .vscode folder
2. Add following code in it.
1// ~/.vscode/settings.json
2{
3  "prettier.documentSelectors": ["**/*.astro"],
4  "editor.defaultFormatter": "esbenp.prettier-vscode"
5}
5. Install and setup Eslint#
Use this command and install following packages.
1npm i --save-dev eslint eslint-plugin-astro @typescript-eslint/parser @typescript-eslint/eslint-plugin eslint-plugin-jsx-a11y
If you're not using TypeScript, skip installing @typescript-eslint/parser and @typescript-eslint/eslint-plugin packages. Create a new file named .eslintrc.cjs in your project's root folder.
1touch .eslintrc.cjs
copy paste the following code in it.
1module.exports = {
2  extends: [
3    "plugin:astro/recommended",
4    "plugin:jsx-a11y/strict",
5    "eslint:recommended",
6    "plugin:@typescript-eslint/recommended"
7  ],
8  overrides: [
9    {
10      files: ["*.astro"],
11      parser: "astro-eslint-parser",
12      parserOptions: {
13        ecmaVersion: "latest",
14        parser: "@typescript-eslint/parser",
15        extraFileExtensions: [".astro"],
16        project: "./tsconfig.json"
17      },
18      rules: {}
19    }
20  ],
21  env: {
22    node: true
23  },
24  rules: {
25    "@typescript-eslint/ban-ts-comment": "warn"
26  }
27};
Update your ~/.vscode/settings.json with this configuration.
1// ~/.vscode/settings.json
2{
3  "files.autoSave": "onFocusChange",
4  "editor.formatOnSave": true,
5  "editor.defaultFormatter": "esbenp.prettier-vscode",
6  "editor.codeActionsOnSave": {
7    "source.organizeImports": "explicit"
8  },
9  "eslint.validate": [
10    "javascript",
11    "javascriptreact",
12    "astro", // Enable .astro
13    "typescript", // Enable .ts
14    "typescriptreact" // Enable .tsx
15  ],
16  "prettier.documentSelectors": ["**/*.svg", "**/*.astro"],
17}
That's it. ESLint should be working like a charm.
6. Next Steps#
I've set up editorconfig and lefthook in my project. Explore these for additional functionalities.

